Key Highlights
- Discover 10 easy mehndi designs perfect for anyone new to the art of mehndi.
- Learn step-by-step instructions on how to prepare your skin and apply simple designs.
- Find out about essential tools and materials you need to get started with your first mehndi design.
- Explore trending mehndi styles for 2025, including modern fusion and festival-inspired ideas.
- Get expert tips to make your mehndi stain darker and last longer.
- Understand common mistakes beginners make and how to avoid them for neat lines.
Introduction
Welcome to the beautiful world of mehndi! This traditional art form is a wonderful way to celebrate joy and beauty. If you’re a beginner, you might feel intimidated by complex patterns, but there’s no need to worry. A simple mehndi design can look just as stunning and is the perfect starting point. This guide is all about helping you create gorgeous hand mehndi designs with ease. Get ready to explore simple patterns that you can try right away, even with no prior experience.
10 Easy Mehndi Designs Beginners Can Try Right Away
Are you looking for easy mehndi designs that you can create yourself? You’ve come to the right place. For a beginner, starting with simple designs is the key to building confidence and mastering the art of mehndi. These patterns focus on basic shapes, neat lines, and minimal details, making them quick to apply and beautiful to wear.
From elegant floral trails to chic minimalist patterns, these ideas are perfect for any occasion. Let’s explore some very easy mehndi designs that will help you adorn your hands without any fuss.
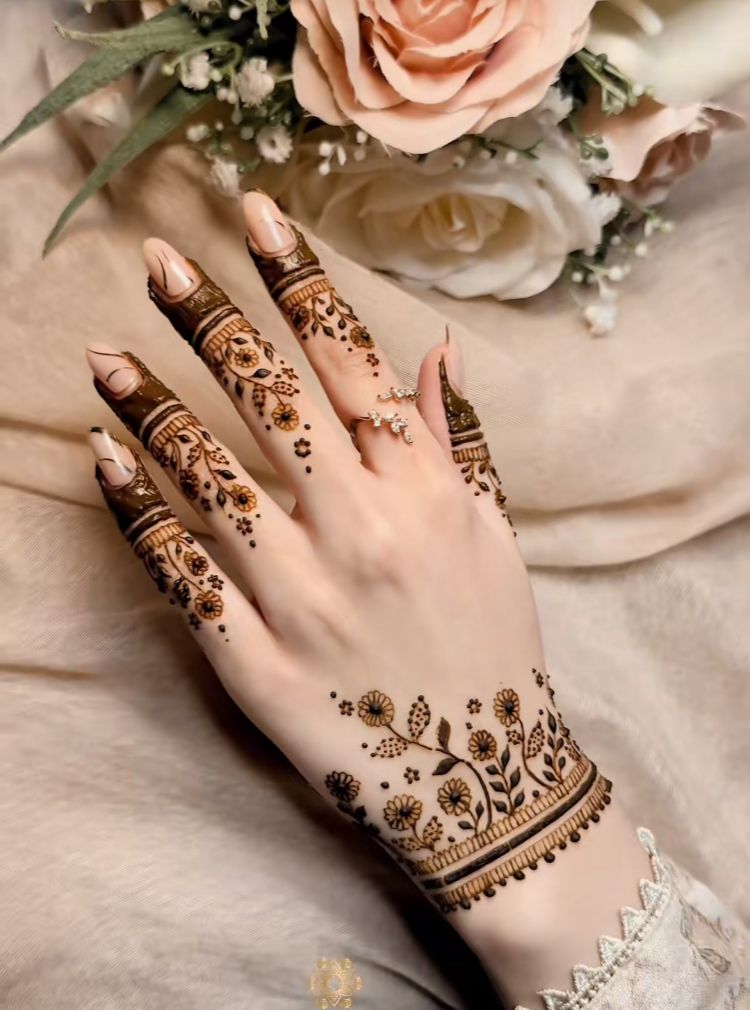
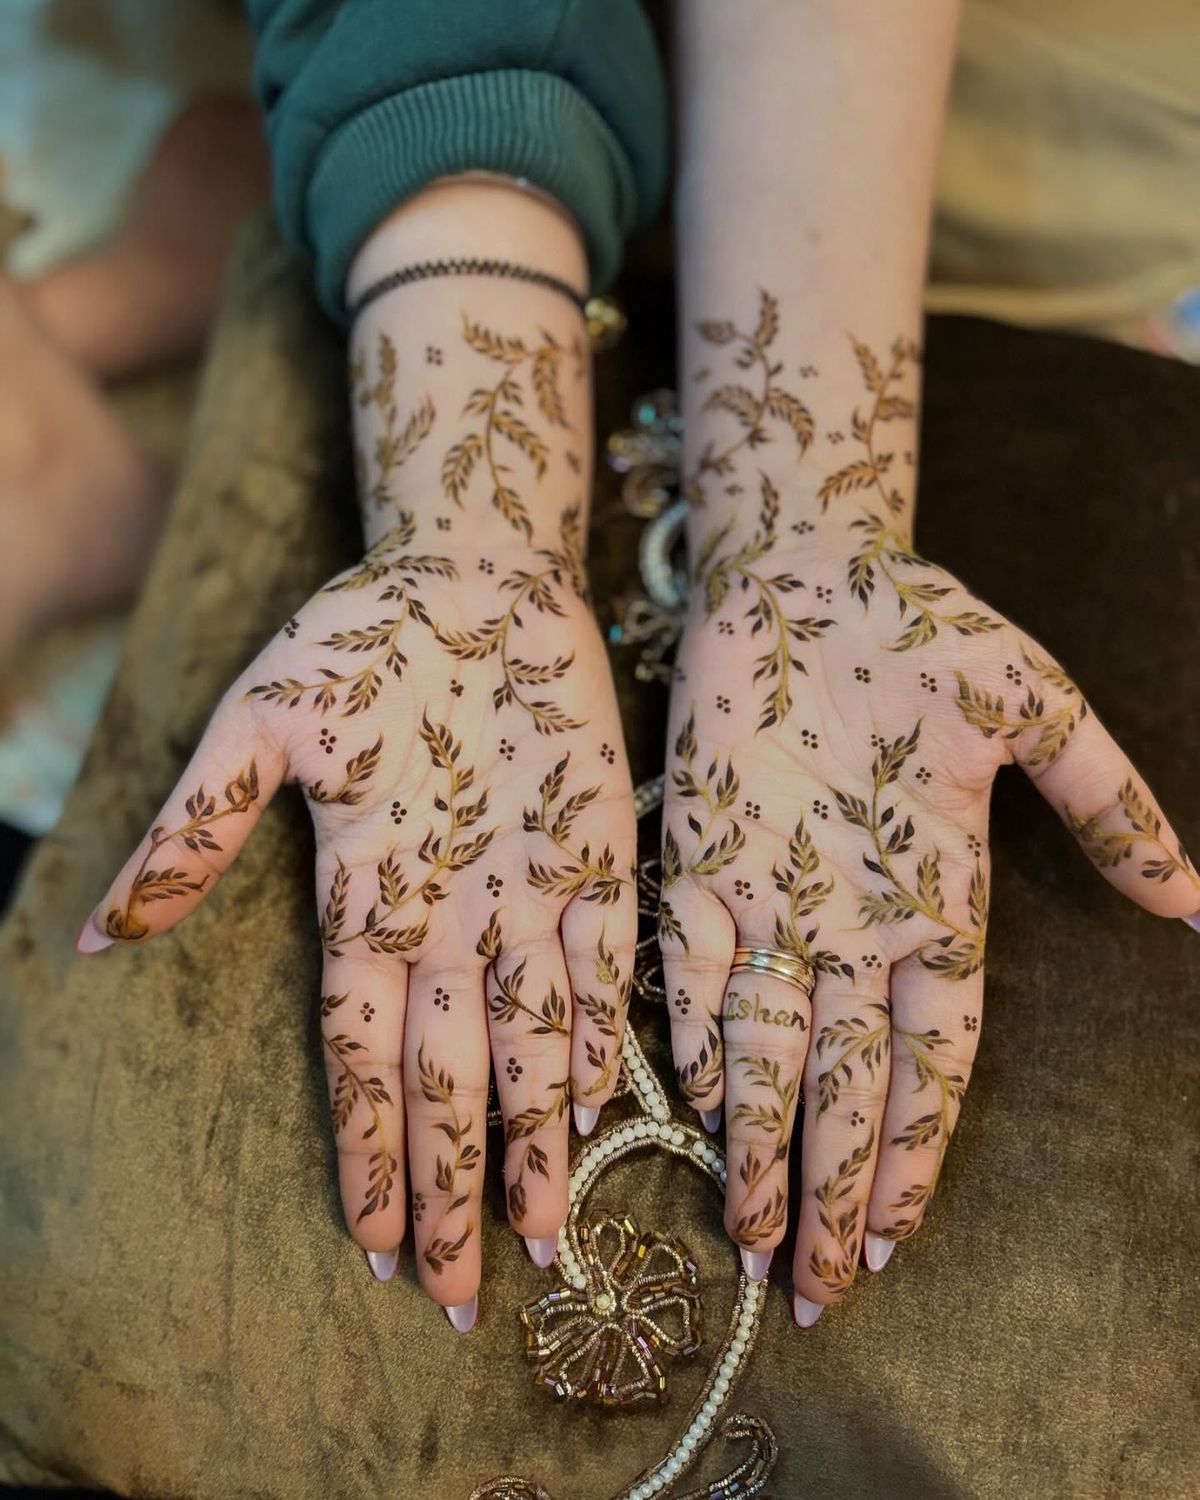
1. Simple Floral Vine Pattern for Quick Application
One of the most classic and easy options for a beginner is the floral vine pattern. This simple mehndi design features a beautiful floral trail that typically flows from the wrist up toward the index finger. It combines small flowers, often roses, with delicate leafy vines, creating a graceful and natural look.
The beauty of this design lies in its simplicity. It doesn’t require intricate shading or complex shapes, relying instead on basic strokes that are easy to practice. You can draw this design on either the front or the back of your hand, and it will look equally elegant. Its flowing nature makes it a timeless choice for festivals and family gatherings.
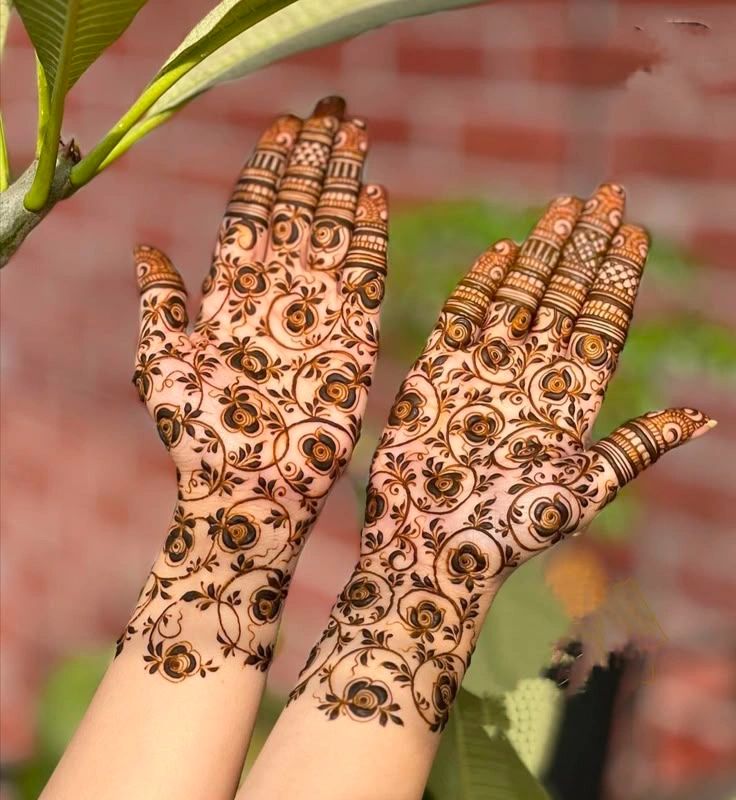
Because it is so straightforward, the floral vine is a perfect starting point. It allows you to practice creating smooth lines and connecting different elements, building a foundational skill for more elaborate designs in the future.
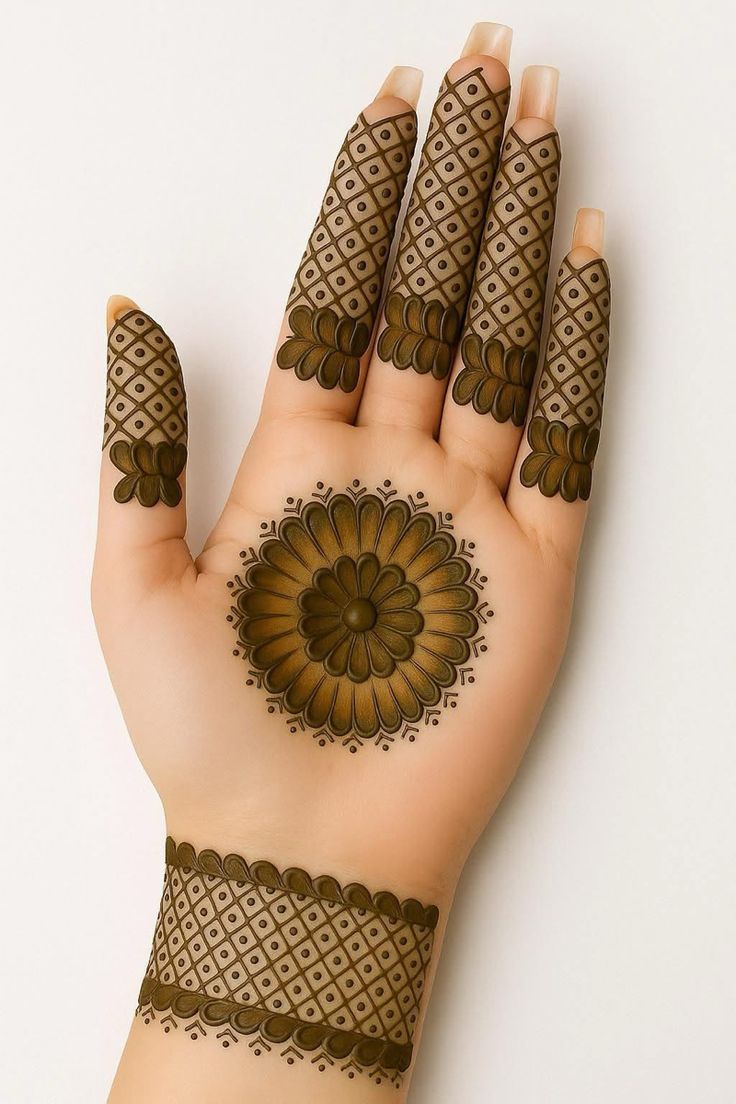
2. Minimal Mandala Mehndi for Front Hand
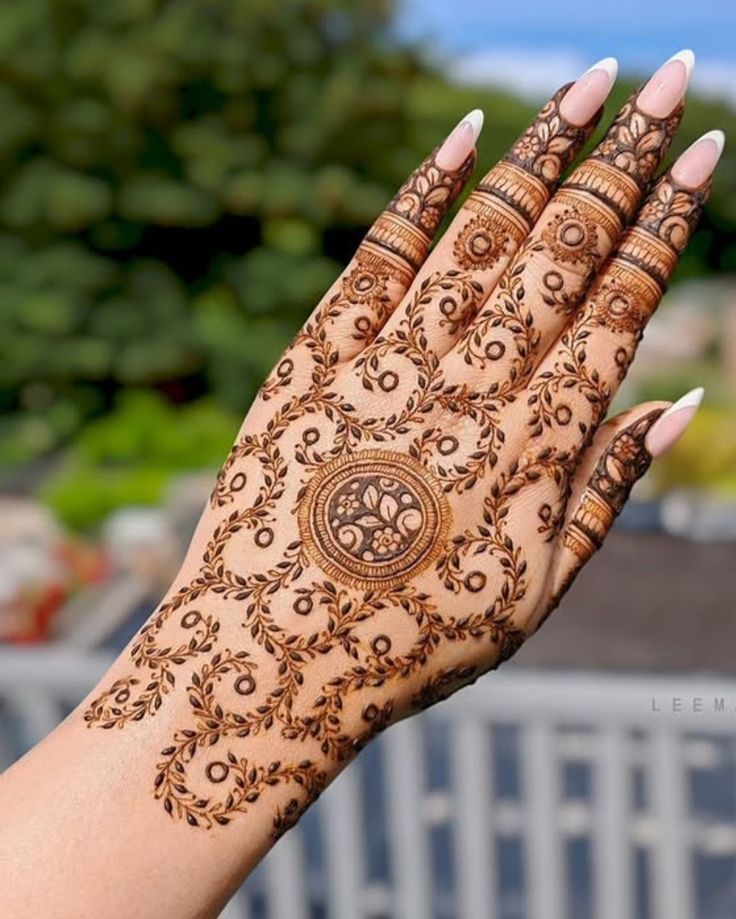
The mandala is a favorite in the world of mehndi, and for good reason. This design features a circular pattern drawn in the center of the palm, which serves as a stunning focal point. For beginners, a minimal mandala is an excellent choice for a front hand mehndi design. It looks intricate but is surprisingly simple to create at home.
Start with a central circle and build upon it with surrounding dots, petals, and neat lines. This symmetrical design creates a balanced and traditional look without overwhelming the hand. You can keep the fingers simple with just a few dots or small motifs to complement the main pattern.
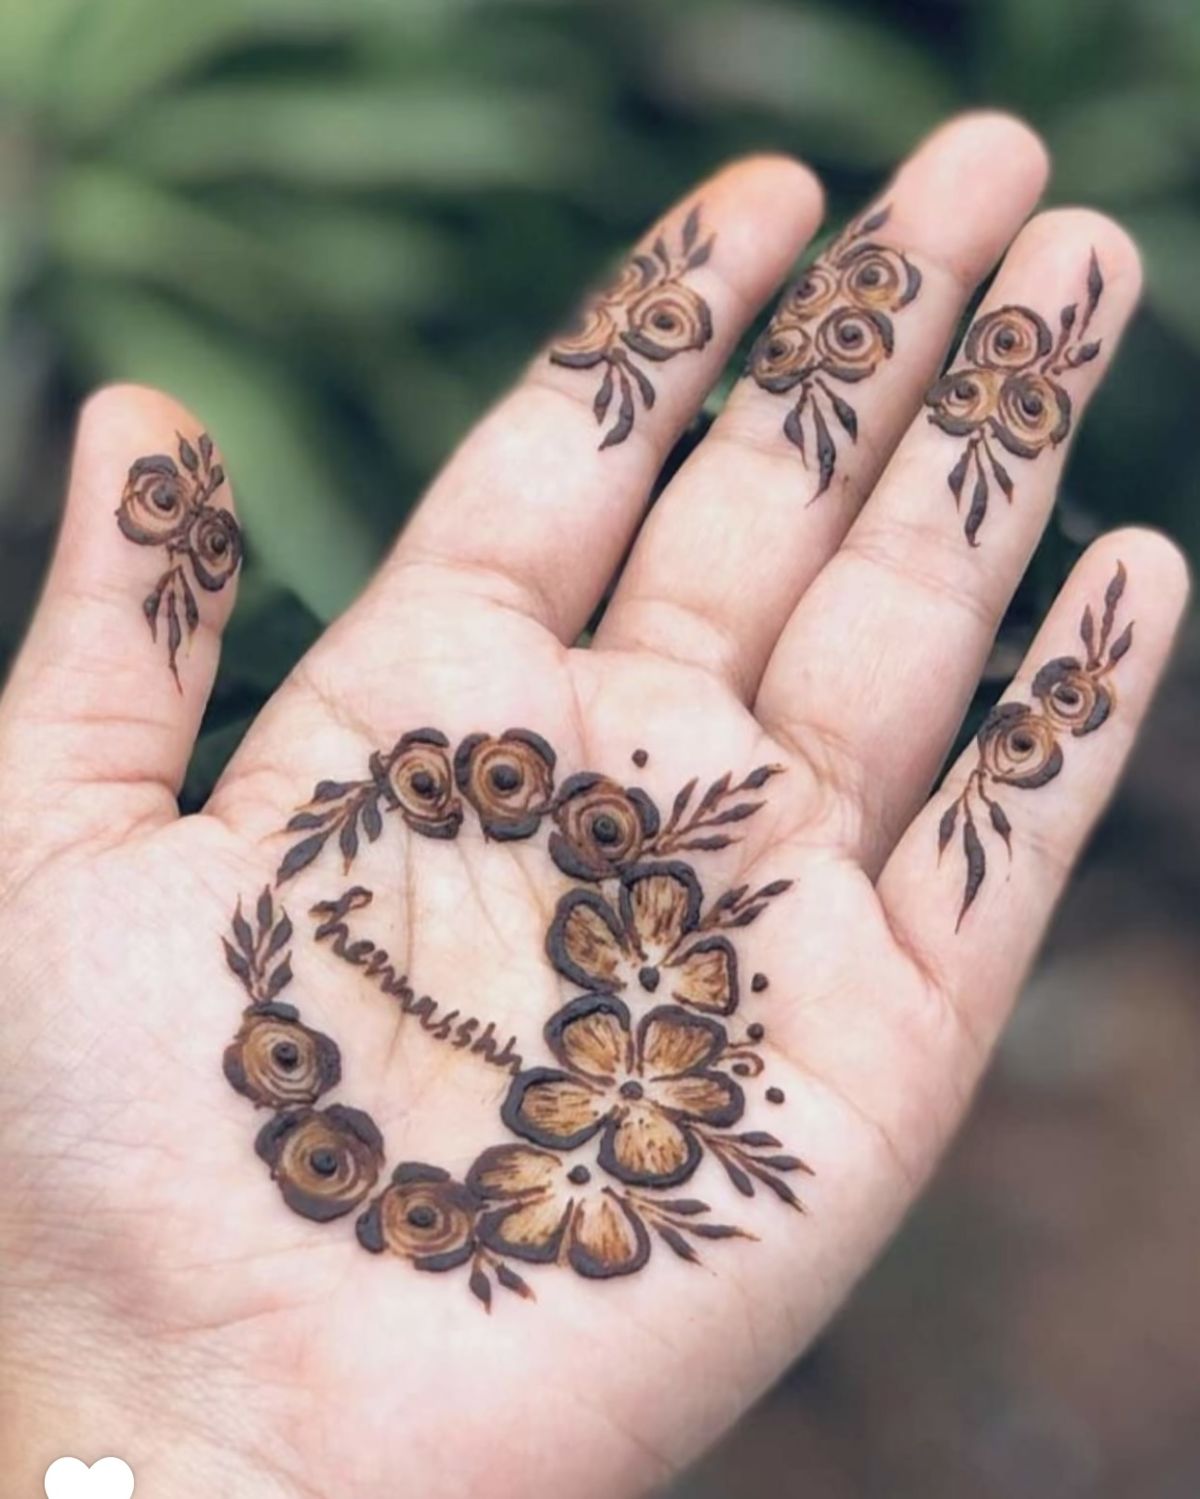
The mandala is a great way to practice control and precision with your mehndi cone. The repetitive nature of the circular pattern helps you develop a steady hand, which is essential for achieving clean, beautiful results every time.
3. Elegant Bracelet Style Mehndi for Wrists
If you want a design that is both minimal and incredibly chic, the bracelet style mehndi is a perfect choice. This design mimics a piece of jewelry wrapped around your wrists, adding a touch of elegance to your look. It’s an aesthetic mehndi design idea that is gaining popularity for 2025 because of its stylish and understated appeal.
The core of this design is a band around the wrist, which can be created with simple lines, dots, or floral motifs. From this “bracelet,” you can extend small patterns or trails onto the back of the hand or towards the fingers. Using bold strokes for the main band can make the design stand out.
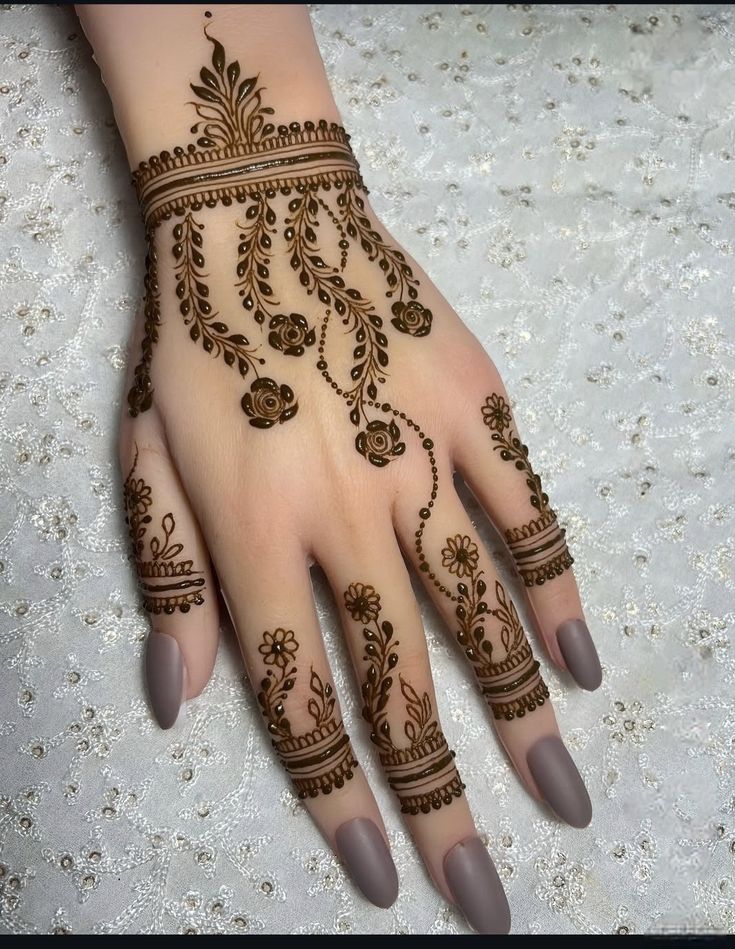
This style is ideal for parties or small functions where you want something beautiful without the commitment of a full hand design. It’s quick to apply, looks modern, and works well for those who appreciate minimalist fashion.
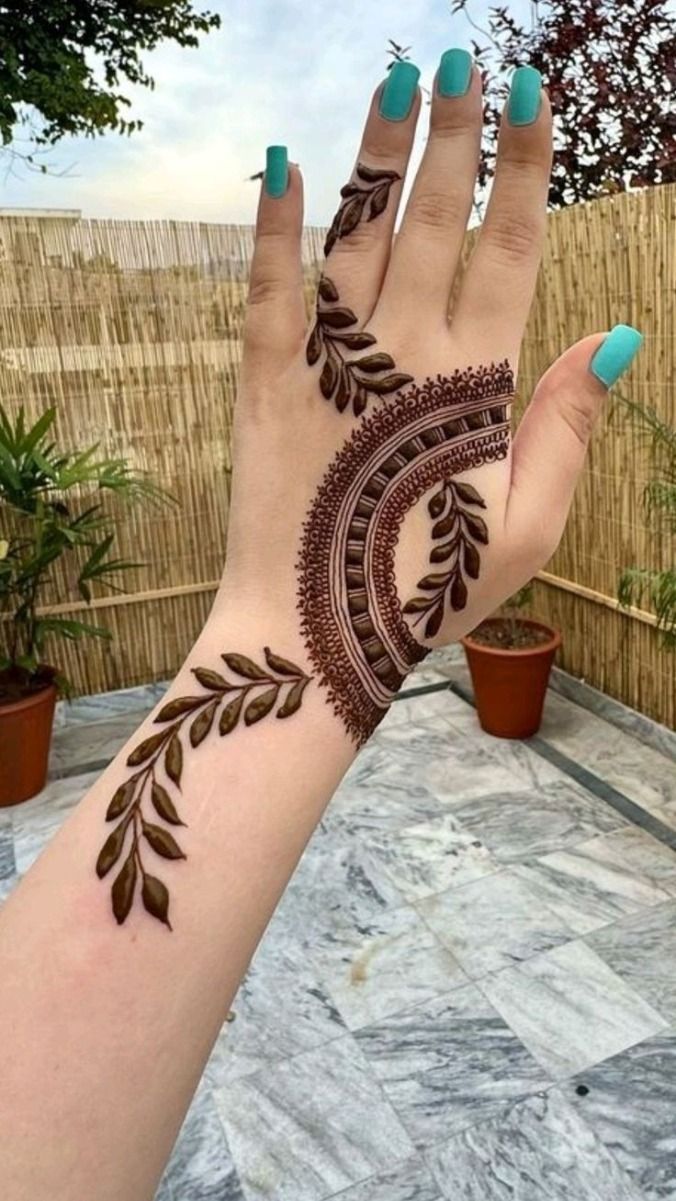
4. Classic Arabic Leaf Trail Design
Arabic mehndi is known for its flowing, bold patterns, and the classic leafy trail is one of its most recognizable styles. This design is a fantastic option for the back of the hand. It typically starts near the wrist and moves diagonally across the hand towards a finger, creating a striking and dynamic look.
As a beginner, you’ll find that creating leafy patterns is quite manageable. The design is built from simple leaf shapes connected by vines. You can vary the size of the leaves and use bold strokes to fill them in, which is a hallmark of the Arabic style. This creates a beautiful contrast on the skin.
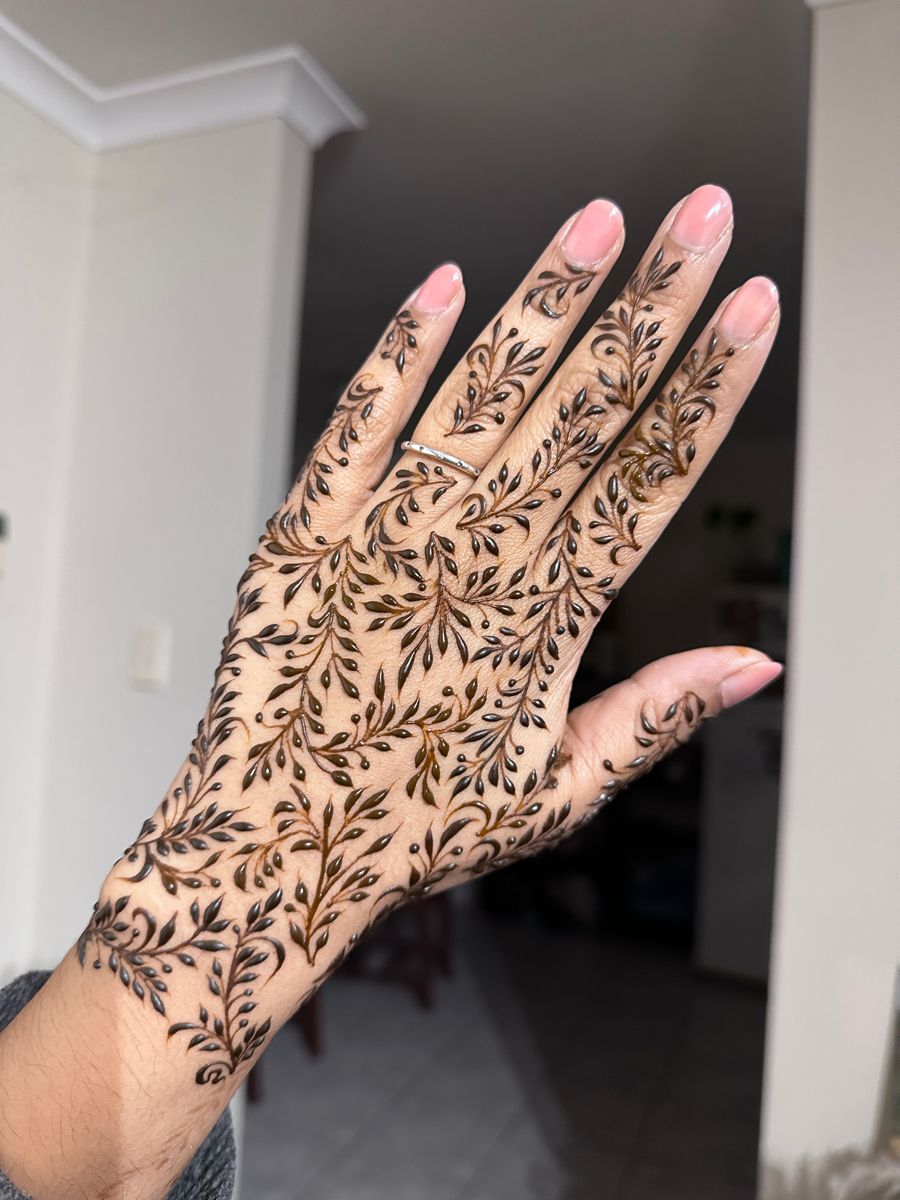
This design doesn’t take much time to apply, making it a great choice for festivals like Eid or other celebrations. The leafy trails add an element of elegance and movement, making your hands look beautiful from every angle.
5. Dots and Lines Minimalist Mehndi for Fingers
For a truly minimalist and modern look, you can’t go wrong with a design focused on dots and lines. This simple pattern is perfect for fingers and is an excellent choice for festivals, casual occasions, or even everyday wear. The beauty of this style is in its simplicity and geometric appeal.
You can create countless variations by arranging dots and lines in unique patterns on your fingers. Try creating bands, chevrons, or delicate trails that run the length of each finger. Leaving the palm empty puts all the focus on the chic, decorated fingers.
This style is incredibly quick to apply, taking only a few minutes to complete. It’s a great way to add a touch of beauty to your hands without committing to a large design. If you’re looking for a simple mehndi pattern that is both stylish and easy, this is a fantastic option.
Step-by-Step Guide to Drawing Easy Mehndi Designs
Learning the art of mehndi is an exciting journey, and this step-by-step guide is here to help you get started. As a beginner, mastering how to hold the cone and apply steady pressure is your first goal. With a little practice, you can create a beautiful mehndi design you’ll be proud of.
This section provides an easy-to-follow tutorial, from gathering your supplies to preparing your hands and drawing your first patterns. Let’s walk through the process together.
Essential Tools and Materials for Beginners
To create neat and easy mehndi designs, you need the right tools and materials. Having everything prepared before you start makes the process smoother and more enjoyable. These essential tools will help you achieve clean lines and a beautiful final result.
The most important item is your mehndi cone. For a beginner, choosing a cone with a fine tip is crucial as it offers better control for creating neat lines and intricate details. You can buy pre-made cones or make your own henna paste at home for a more organic option.
Here are the essential tools and materials you’ll need:
- A high-quality mehndi cone with a fine tip
- Freshly prepared henna paste (if making your own)
- Paper or a notebook for practicing your designs
- Cotton swabs for correcting small mistakes
- A small pair of scissors to open the cone tip
Preparing Your Hands for Mehndi Application
Properly preparing your hands is a crucial step that many beginners overlook. This simple preparation ensures that the mehndi paste adheres well to your skin and develops into a deep, rich stain. A well-prepped canvas allows even simple elements to look more royal and vibrant.
Start by washing your hands thoroughly with soap and water to remove any oils or lotions. Pat your skin completely dry. Any moisture on your skin can prevent the mehndi from staining properly. For an even better result, you can gently exfoliate your hands a day before application.
Just before you begin, you can apply a few drops of eucalyptus oil to your hands. This oil helps open up the pores on your skin, allowing the henna dye to penetrate deeper. This small step can make a significant difference in the final color and longevity of your stain.
Simple Steps to Create Neat and Aesthetic Patterns
Following a clear step-by-step process can help you create neat and aesthetic patterns, even if you are new to mehndi. The key is to start with basic elements and build your simple mehndi design from there. Practice drawing foundational shapes like dots, lines, swirls, and simple motifs on paper before moving to your skin.
Once you feel comfortable, you can start creating patterns. Link your motifs together with vines or lines to form a cohesive design. Remember to apply gentle, consistent pressure on the cone to create uniform, neat lines. Don’t rush the process; take your time to ensure each element is placed carefully.
Here’s a simple step-by-step tutorial to guide you:
| Step | Action | Tip for Beginners |
|---|---|---|
| 1. Practice Basics | Draw lines, dots, and swirls on paper. | Get a feel for the pressure needed for different line thicknesses. |
| 2. Start Small | Begin with a central motif, like a small flower or circle. | This provides a focal point to build your design around. |
| 3. Connect Elements | Use vines or dotted lines to connect your main motifs. | This creates a flowing, professional-looking design. |
| 4. Add Details | Fill in empty spaces with small dots or tiny leaves. | Details add depth and make your design look more complete. |
| 5. Let It Dry | Allow the mehndi to dry completely without smudging. | Be patient! This is crucial for a dark, crisp stain. |
Trending Mehndi Styles in India for 2025
Mehndi is an ever-evolving art form, and new trends emerge every year. For 2025, the trending mehndi styles are all about blending tradition with modern aesthetics. From minimalist patterns to bold fusion designs, there are many ways to embrace the beauty of mehndi in a contemporary way.
This year’s easy mehndi designs focus on creativity and personal expression. You’ll see a lot of modern fusion styles and designs that are perfect for festivals and special occasions. Let’s look at what’s currently trending.
Minimal and Modern Fusion Designs
One of the biggest trends for 2025 is the rise of minimal and modern fusion designs. These styles are perfect for those who appreciate simplicity but still want their mehndi to make a statement. You’ll see these aesthetic designs all over Instagram, loved for their clean lines and creative layouts.
Fusion designs combine elements from different mehndi traditions. For example, a design might feature the bold lines of Arabic mehndi mixed with the geometric patterns of Moroccan henna and the delicate motifs of Indian designs. This creates a unique, personalized look that stands out from traditional patterns.
The appeal of this modern trend is its versatility. A minimal fusion design can be as simple as a single trail on the back of the hand or a geometric pattern on the fingers. The focus is on negative space and simplicity, proving that less can truly be more.
Popular Festival-Inspired Mehndi Ideas
During festivals like Eid, Diwali, or a family mehndi ceremony, having a beautiful design on your hands adds to the celebratory spirit. Festival-inspired mehndi is a popular choice because it complements traditional attire and captures the festive mood. These patterns are perfect for family gatherings and special events.
While some prefer elaborate designs, many simple mehndi patterns are perfect for these occasions. Arabic trails, floral vines, and mandalas are always in style for festival celebrations. They are quick to apply but look incredibly elegant and festive.
Here are some popular festival-inspired mehndi ideas:
- Arabic Leafy Trails: A classic for Eid, known for its bold and flowing look.
- Central Mandala: A perfect choice for Diwali, symbolizing unity and harmony.
- Floral Vines: Great for any mehndi ceremony, offering a delicate and feminine touch.
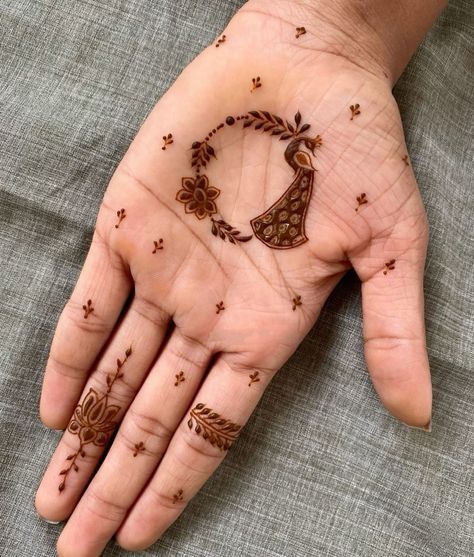
- Peacock Motifs: A royal and traditional design for weddings and major festivals.
- Bracelet Style: A modern and chic option for parties and smaller family gatherings.
Front Hand vs Back Hand: Style Inspirations
When choosing a mehndi design, you’ll need to decide whether to apply it on your front hand or the back of the hand. Both offer a different canvas and can completely change the look of the design. The choice often depends on the occasion and personal preference.
For the front hand, designs are often more intricate and centered, with the palm as the main focus. Mandalas and full-coverage floral patterns are popular choices, especially for a wedding day or major festival. The deep creases of the palm help the stain develop into a rich, dark color.
In contrast, designs on the back of the hand are more visible. The highlight of this design style is often its elegance and ability to complement jewelry. Flowing vines, bracelet patterns, and Arabic trails look stunning on the back of the hand. These styles are great for bridesmaids or guests at a wedding, as they are eye-catching yet not overly dense.
Tips for Beginners to Get Beautiful and Long-Lasting Mehndi
Getting a beautiful, long-lasting mehndi stain is the ultimate goal. As a beginner, a few simple tips can make all the difference in the final result. The beauty of mehndi is not just in the design itself but also in the richness of its color. Achieving that deep, dark stain is easier than you think.
This section will provide you with easy-to-follow tips to help you get the most out of your mehndi application. From tricks to darken the color to common mistakes you should avoid, these pointers will help you achieve professional-looking results every time.
Tricks to Make Mehndi Darker Naturally
Everyone wants their mehndi design to have a deep, rich color that lasts for days. A dark stain can make even a simple design look more royal and striking. The good news is that you can achieve this with a few natural tricks. These aftercare steps are essential for developing a beautiful color.
The key is to keep the mehndi paste on your skin for as long as possible and to protect it from water. The longer the paste stays in contact with your skin, the darker the final stain will be. Adding a few drops of eucalyptus oil before application also helps the color deepen.
Here are some simple tricks to make your mehndi stain darker:
- Leave the paste on for at least 6-8 hours, or overnight if possible.
- Apply a mixture of lemon juice and sugar to the dried mehndi to keep it moist.
- Warm your hands over clove smoke after the paste has dried.
- Avoid contact with water for at least 12-24 hours after removing the paste.
- Apply a natural oil like coconut or mustard oil to the stain to protect it.
Common Mistakes to Avoid for Clean Designs
As a beginner, it’s normal to make a few mistakes while learning to apply mehndi. However, knowing what these common pitfalls are can help you avoid them and achieve clean designs from the start. Creating neat lines is all about control and patience.
One of the biggest mistakes is using a cone with a tip that is too thick, which can make your design look messy and undefined. Another common error is not allowing the mehndi paste to dry completely, which leads to smudging and a lighter stain.
To help you create neat and easy mehndi designs, here are some common mistakes to avoid:
- Using a cone with a thick or unevenly cut tip.
- Applying the paste too quickly, which leads to shaky lines.
- Washing your hands with water too soon after application.
- Skipping essential aftercare steps like applying a lemon-sugar mixture.
Conclusion
In conclusion, experimenting with Mehndi designs can be both fun and rewarding for beginners. The ten easy patterns highlighted in this blog provide a great starting point for anyone looking to explore this beautiful art form. From simple floral vines to elegant bracelet styles, these designs are not only easy to replicate but also help build confidence in your Mehndi application skills. Remember, practice makes perfect, and with the step-by-step guide and tips provided, you’ll be well on your way to creating stunning Mehndi that you can proudly show off. So gather your materials, get creative, and enjoy the process of adorning your hands with beautiful designs!
Frequently Asked Questions
Which mehndi design is best for beginners?
For a beginner, the best options are a simple mehndi design like floral vines, dots, or ring-style patterns. These designs rely on basic shapes and neat lines, requiring very little practice to master. Starting with these simple floral styles helps build confidence before moving on to more complex patterns.
How do I make my mehndi design look more royal with simple elements?
To give your mehndi design a rich look, focus on the quality of the paste and the application. Using bold strokes for key motifs can add drama. Also, ensure your paste gives a dark stain by following aftercare tips. This will make even simple patterns appear more luxurious and royal.
Are there easy mehndi designs suitable for weddings and festivals?
Yes, many easy designs are perfect for a wedding day or festival. While not as dense as a full bridal mehndi design, styles like Arabic trails, bracelet patterns, and mandalas look elegant and are suitable for bridesmaids or guests at family gatherings. They offer a festive look without taking hours to apply.